Sunday, November 18, 2012

Buckeye Brownies!


This is my husband's all-time favorite treat. 

He recently traveled for business and was gone for 2 weeks.  While away, he called and asked me to MAIL him some!  I had to pass, as i was certain that these would arrive in a big gloppy mess after enduring the trip through the mail.  SO...I made him a pan, and here's how:

First:  Make a 9x13 pan of brownies!

Here's my favorite recipe, but you can actually even use a box mix if you so desire.  Your call.


BUCKEYE BROWNIES


2 cups white sugar
 1 1/2 cups all-purpose flour
 1/2 cup baking cocoa
 1 1/2 teaspoons salt
 1 teaspoon baking powder
 1 cup vegetable oil
 4 eggs
 2 tablespoons light corn syrup
 1 teaspoon vanilla extract
1 17 oz  jar Jif Extra Crunchy Peanut Butter
2 tbsp salted butter (not margarine)
6 oz semi sweet chocolate chips

_______________________

Preheat oven to 350 degrees F (175 degrees C). Lightly grease a 9x13-inch baking pan.
Combine white sugar, flour, cocoa, salt, and baking powder in a bowl. Whisk oil, eggs, corn syrup, and vanilla extract in a small bowl. Stir egg mixture into flour mixture; Spread into prepared baking pan.

Bake in preheated oven until a toothpick inserted near the center comes out clean, about 30 minutes.


Easy enough. 

When your brownies have cooled, about 20-30 minutes, remove the lid and foil from your peanut butter jar and place the whole thing in your microwave and warm for about 30 seconds.  Watch carefully. If this boils over, you'll have a real mess on your hands.  Spread on top of cooled brownies.

When THAT layer is cool, melt your chocolate chips with the 2 tbsp of butter and stir with your whisk until glossy.  Spread atop the cooled peanut butter layer.

Allow to settle for an hour, and cut.  

Makes 36 delicious brownies.


Enjoy!


Sunday, September 23, 2012

Tutorial Time! I Made My Very Own Handmade Sign!

Welp, I bit the bullet and did something I thought I would hate...pained a sign.  It looks hard, and it looks fussy, messy, and I hate painting intricate things.  Give me an old dresser and I'll paint that all day.  Ask me to paint a leaf?  Or a spiral or a cottage rose and you're on your own.

So, here's what I did:  I made this! 


Not bad, eh?  It cost me a whole  $0.53.  Yes, fifty-three cents.  I had most of the materials on hand, and I found the wood at the Habitat For Humanity Re-Sale Shop.  It's an old cabinet from someone's kitchen.

Here's how I did this.


Coat your old cabinet with a couple of coats of primer.  I found this in our garage, so I used this.


This stuff is goopy and snotty and smelly, so use a foam brush that you can just toss.  Let it dry really well and give it a couple of coats of acrylic paint.  I used these:


Here's one that's on my workbench, waiting for a little more love.


Now, we're going to get down to business, and I apologize for not having photos of this step, but I was getting down to business!
Print your message out on your printer, to the exact size that you want your letters on your sign.

Cut them out and tape them very gingerly onto your painted board, with a piece of ordinary carbon paper underneath.

I used this:


I had this laying around, but I believe you can purchase this at Office Max or Staples for less than $2.00.  

NOW....trace around your letters.  Take your time.  Use a ballpoint pen and push hard enough to leave a bit of an indent in your wood.  This helps the paint "stay in the lines,."  Use a teeny tiny pointed brush...here's a photo of my brush collection. Yes, I have a problem.  I love craft supplies.


The super pointy one?  That's the one.  Outline your letters, then fill in with a thicker brush.  Take your time, take breaks....relaxxxxx.


When you are satisfied with your masterpiece, give it a light sanding....I used "finishing" sandpaper (pictured above)...I sanded a bit heavier along the edges, and lighter over the letters, but the overall effect was "weathered."  I think I did great.  Here's a closeup.  See my corneres, there?  And the white kind of showing through toward the bottom?


I considered an antiquing finish as well, but I was simply tickled with what I had, so I finished off with a light varnish, added a couple of sawtooth hangers and BOOM.  I made a sign for fifty-three cents.

I would estimate that had I purchased all of my materials, this would have still cost less than $20.00 to make!  

OK, your turn!  Really, give it a shot!  This project only took a couple of days due to drying time, and was well worth it! 

Here is my next victim! I found this sweet thing hanging out at the end of someone's driveway on trash day!

What should I do with THIS little sweetie?


Monday, September 17, 2012

New in my Etsy Shop! Lake Michigan Sea Glass Necklace!

I designed this darling necklace with center drilled sea glass from my personal collection. Here, I have used three similarly shaped pieces in powder blue, petal pink, and a misty, minty green. These have been mounted on a sturdy length of solid sterling wire, with sterling silver ball spacer beads, and neatly wire wrapped onto a dainty sterling chain.

Because sea glass is SO unique, I only have this one available at the moment!  Sea glass is hard to find, but  I am not complaining...the time it takes to find these is well worth the time I get to spend combing the beach!

You can find this necklace here;  http://www.karmabeads.etsy.com


Friday, September 14, 2012

New Design! A Tiny Perfume Bottle with One Tiny Wish!

I found these tiny crystal perfume bottles at our local bead shop here in Grand Haven and I knew exactly what I was going to do with them!

And I just love what happened!  


As luck would have it, the tiny little hollow area is the very size I needed to hide one tiny dandelion seed!  Can you see it?

:)

Then, I wrapped a couple of perfect little freshwater pearls to the clasp and hung one on the pendant and voila....a wish necklace, for you from KarmaBeads on Etsy.


I hope you love this too!

Sunday, August 12, 2012

It's The Great Pumpkin (earrings!)

I'm kind of in some type of earring phase, I suppose, but I've had these darling little orange pumpkin beads in my stash for a while now, and with this cooler weather, well, I can't help myself!  Had to!

What do you think?  :)  I hope you love them! 


It won't be long now until we're carving our Halloween pumpkins!  I adore fall!

Saturday, August 11, 2012

New Design - Silver Crescent Moon Earring...Love!

Since our move to the beach, we have discovered such a simple pleasure, swimming in the lake under the moonlight....it's just magical.

So, when I saw these handmade beads, I just HAD to have them.  I couldn't wait to get them home and make earrings out of them....I hope you love them as well. 

:)

Enjoy!


Thursday, June 7, 2012


Time to revisit The Ripple Effect. 
In these hurried times, take a minute to just lend a warm smile..you don't
have to do anything monumental.  You may not ever know it, 
but you could actually change or even save a life.


Friday, June 1, 2012

We are FINALLY moved! HOORAY!

As some of you know, Kevin and I made a big decision and decided to move to Lake Michigan.  After much consideration and thought (and love of the beach)...we researched school districts for our son, who will be entering 8th grade, and is a person with Autsim, and we chose to make Grand Haven our new home.  And we love it here.


Our son is a new person at the beach.  For some reason, all signs of Autsim just disappear.  He is relaxed, and is "in the moment" ie: no "zoning",  and is joyous.  Seeing that makes me joyous.  He has been through hell this past couple of years, and deserves only good things.  He was bullied nearly to death in Holt.  So we're letting all of that go, and starting over!  


Yesterday, Matthew and I just rolled around in the sand.  It was overcast and actually a bit chilly, but the sand was warm and Matthew was happy.  He wanted to bring home a ziplock bag of sand.  


So, that's what we did.  When I got this sand home, we sifted through it and found TREASURES!  And that's what inspired my latest listing in my Etsy shop.  I love this!


See the little snail shell in the largest photo?  SO CUTE!  And shells, and moss, and driftwood and seaglass, and seagrass!  LOL!  Fun.


You can view the actual listing here:
https://www.etsy.com/listing/101131564/silver-mermaid-lake-michigan-sea-glass

Have a lovely day!  And if you find yourself in Grand Haven, Michigan, look us up!  We love the beach!

Wednesday, May 30, 2012

Refrigerator PIckles - A Family Tradition.

I have a sunburn, so it is now summer and that means it's time to start my never ending pickle pot!


I've had one of these babies going in my fridge every summer since my grandmother started this tradition, and I even have some of her old jars that I use in her honor.  These are THE best pickles and this is THE best recipe, but that's just my opinion!  

You can keep rotating this brine indefinitely, just add a few more (or less ) seasonings, some vinegar and water, and it will last about a month.  Adjust to your family's liking. Our family likes lots of garlic and lots of vinegar and tons of fresh dill.  :)

Let's get started.  First you will need to gather up all of your ingredients...Cukes ( I use the regular old cukes from the grocery store.  Use what YOU like!  One large red onion, one orange pepper, Heinz white vinegar, kosher salt, mustard seeds, coriander seeds, dill SEEDS, (now weed), fresh dill (VERY important!) and fresh garlic.  YUM.


OH this smells so good...  Now, prepare your veggies, I like to cut my cukes rather thick, and I only remove about half of the skin.  This keeps them nice and crunchy.


Cut your orange pepper and your red onion into rings (these really have very little impact on the flavor of your pickles.  They pickle up just like your cukes, but MAN these are YUMMY on a brat or a burger fresh from the grill.  OK..now peel your garlic.


SO pretty and SO fragrant.

Now, let's layer these up.

I've used a glass jar with a lid that I found in the kitchenware department at Target.  They have 3 sizes.  This is the medium sized one, and I always have to put some pickles into my big blue Mason jar in honor of my grandmother who taught me this recipe.

Drop in your garlic.  I use 3 peeled pieces per jar.  If you like more, use more.  Then, add your cukes, onions, peppers, and fresh dill.  Layer them so they look pretty. 


GORGEOUS!

Now mix your spices.  


I have used two containers, so I'll use about 1/4 for my Ball Jar and the rest in my glass jar.  

Pour on top of your layered veggies.  Should look like this:


Next, we need to mix our brine.  Or, our vinegar and water.  This is where tastes will vary greatly.  We like ours quite vinegar-y.  If you don't want a strong bite, mix your vinegar and water half and half, if you like it vinegary as we do, go one part water / two parts vinegar.  You can always adjust this later as you begin to eat your pickles!

Pour your vinegar and water mixture over the spices and veggies until it reaches the top of your container.  


Pop your lid on, give it a few little shakes, and watch the spices and seeds float around a bit.  And guess what?  You just made pickles, darling.  Pop in your fridge, and  you will have crunchy, delicious, fresh chemical-free pickles all summer long.

As your brine and your pickles begin to disappear, add more!  Chop up a cuke.  If you have leftover salad ingredients such as asparagus, raw green beans, cauliflower, etc, toss them in your pickle pot.  Experiment and make this your own and ENJOY!  You will notice that your brine will become cloudy after a while, at that time, start over with a fresh batch.  

With love, 

Karen

RECIPE

 Refrigerator Garlic Dill Pickles

2 quarts Heinz White Pickling Vinegar
1 quart water 
Fresh dill
6 cloves of garlic, peeled 
10 tsp kosher salt
4 tsp mustard seeds
4 tsp coriander seeds (not ground, be sure you're using seeds)
2 tsp black peppercorns
4 tsp dill seeds (not weed)
10 medium sizes cucumbers
1 large red onion
1 large orange pepper

Prepare your veggies:  peel and chop cukes into 1/4 inch thick rounds.  Peel garlic, cut pepper and onion into rings. 

Pack into container(s) .... Use glass only.  The vinegar will break down a plastic container and you will end up with a big batch of yuck.  Layer garlic, cukes, onion, peppers, and fresh dill.  

Mix your spices.  Divide evenly amongst containers and place right on top of your layered veggies.

Mix your brine.  Mix to your liking.  You can easily adjust this later.  Remember, this is YOUR recipe!

Pour over veggies, pop a lid on, and place in your fridge overnight.  

ENJOY!


Wednesday, May 16, 2012

Please indulge me....

This is a pet post.  I know that there are way more than enough pet photos on the internet, but when I saw this picture of our Border Collie, Chaser....I nearly cried from the cuteness.   He's just all: "MOM PLEASE FOR THE LOVE OF DOG!  GIVE ME A MORSEL!"  The pathetic little guy did, in fact, get a bite of my Mother's Day egg casserole.  :)  Bless his little pointed head, I love this dog.


Tuesday, May 8, 2012

Ugly Brass Chandelier to Pretty Brass Chandelier!

OK I'll admit it.  I'm that mom who will slam on the brakes when I see a "good" pile of junk aside the road.  Much to my children's dismay.  When I saw this poor thing sitting beside a dumpster FOUR YEARS AGO....I couldn't resist.  OK, I could, kind of.  Because I took it home and it sat in my basement storage room for the next four years.

Pretty bad, huh?  It was actually put together, this is what it looked like after I dissected it and wiped it with my (thank you lord for these), Mr Clean Magic Eraser.

I then gave this old girl a squirt of my trusted spray primer and some spray paint, put her back together, added some swagggggg......and she now hangs in our beach house.  I love her. 


This was a quick and simple project!  Really, my kids could do this!  And these poor old, sad fixtures are alll over the place.  While I got this one for free, you can find them in the thrift stores and on Craigslist every day!  Enjoy!


Monday, April 30, 2012

Side-by-Side

And here we have it...finally...a side by side before and after:


I'm just tickled!

Friday, April 27, 2012

Ugly Cabinet / Pretty Cabinet - An Adventure in Thrift Shop Furniture Refinishing

This cabinet has lived in the shadows of our home for many years, first, in a corner in the basement, where we just piled miscellaneous treasure on top of her, to my daughter's room where she held up my daughter's tv, pop cans, candy wrappers, you get the idea.


In preparation for our big move, I wanted to give this baby a coat of paint and make her gorgeous.  I've always known this cabinet had big potential, but I had no idea it would turn out as good as it did.  I'm just tickled!


So......I dragged it out into my driveway on the first sunny day we had (we're in Michigan, enough said)....and began to remove the cobwebs, dust, and gave her a good once-over.


As you can see, this cabinet is just sad.  The top is scratched, the are gauges all over it, no biggie.  


I removed the handles (they are lovely).....and, because I am LAZY....I didn't even sand it.  I used this magic stuff:  (2 cans)


Covered absolutely EVERYTHING.  You don't need a lot, just make sure every surface is covered.  Now came the fun part.  PAINT.


I chose a color called "Well Water" , I got it at Lowe's, and I chose a semi gloss, just because I adore semi gloss.  


I had these napkins, I think I found them a year or so ago at Party City.  The "well water" (it's Robin's Egg, in my opinion), blue in the napkins perfectly matched the blue on my cabinet.  
SO.  I grabbed a foam brush and my trusty Mod Podge and, in a very short time I had THIS:


Isn't she pretty?  I'm just in love with this cabinet now.  I replaced the original handles, and they just give it that finishing touch.  I will still add about 3 coats of varnish to the Mod Podge part, and one to the overall piece, but I just couldn't wait to share this.  After our move, I will show you an "action shot"....I have big plans for this baby.  LOVE.  


If I recall, we paid $10.00 for this cabinet at a thrift store. :)


To say I am just tickled would be an understatement!


COMING UP NEXT.........Vintage Printer's Tray re-do.  


Have a lovely Friday!

Thursday, April 26, 2012

Super Quick and Easy Sunday Breakfast Casserole

My family just adores this meal.  
We're in the process of moving ACROSS THE STATE....so my cooking adventures have been a bit pitiful lately.

I always make a huge Sunday breakfast for my kiddos and husband, and they look forward to it...so I felt very guilty when they wandered about last Sunday looking sadly at the empty breakfast table (they're just spoiled.)

I remembered this, and, luckily, I had all of the ingredients on hand.  This can be made in so many variations, so use your imagination.


Here's how I made this one:

You will need:
-cooking spray
-one can of ready-made croissant rolls
-6 eggs
-2 cups of shredded cheese
-shaved ham
-fresh asparagus (blanched)
-salt and pepper to taste

Preheat oven to 350 degrees.
Spray 9 x 13 pan with cooking spray
roll out croissant rolls
beat eggs with cheese, pour on top of croissant rolls
top with shaved ham (you could also use crumbled, cooked sausage, bacon pieces, etc..)
add asparagus, salt and pepper to taste.

Cook for 30 minuts or until cheese browns and casserole is bubbly.

Serve with fresh fruit, toast and jam and some juice and coffee and you are A SUNDAY MORNING HERO!

:)

Enjoy! 

Coming up:  My cabinet is done!  Pics to come!  

Have a lovely Thursday!


Saturday, April 21, 2012

Ugly Cabinet to Pretty Cabinet

I found this hideous cabinet at a thrift store years ago....it's been in a spare room for quite a while, used for storing miscellaneous treasures.

Time for this baby to shine.....so here's a before pic....stay tuned.  This is going to be just gorgeous when I'm done...and I'll post a tute as well.  

Refinishing old furniture is a favorite hobby of mine.....paint is magic.


Sunday, March 18, 2012

Heat Wave!


March in Michigan usually involves snow.  Plenty of snow!  Somehow, we have lucked out this year, and escaped the mountains of snow!  I'm not sad about that one bit!  Our gardens are coming up, there are bunnies hopping about in our back yard, and I'm preparing for the beach!  Here's my newest design, this is a hollow bead that I have filled with the tiniest sea glass I have in my collection.  I love this.  It makes a really peaceful sound when the glass shakes within the glass.  I made one for you, and one for me! <3


I LOVE these!  You can find these in my Etsy shop:  http://www.karmabeads.etsy.com

Monday, February 6, 2012

Where do the weekends go?

We had such a lovely weekend.

What did we do, you ask?  Not a thing. Nada. Of course, there was the usual laundry, cooking, cleaning(minimal)...but ya, not a damn thing, and it was fabulous.  I got up on Sunday morning, showered, and put on clean jammies and that's how I stayed until......well, let's see here, it's 10am on Monday morning now.  

My husband even got the kids up and off to school...ha.  I am ...well, feeling guilty.  Must have needed it.

Last night was the Superbowl, and I was able to stay on target with Weight Watchers, except I may have overdone it on BUTTERNUT SQUASH.  I was so full.  

Yes, I am a wild thang.  (sigh)....In years past, I would have "overdone it" on beer, chips, dip, wings, and brownies, but two cups of butternut squash sent me into a food coma.  My weigh in is tomorrow and I will be tickled.  I can tell.  I feel good.

Valentine's Day is fast approaching and my Etsy is BUSY!  Today will be an all-day studio day, followed with some shopping and karate! 
WOOP!

I have 11 orders to complete and mail by 2pm, better move it!  xoxox

Saturday, February 4, 2012

Why am I on Weight Watchers?

SO THAT I NEVER HAVE THIS SELF DIALOGUE EVER AGAIN!  


Ok, that's not the only reason, the health benefits, longer life, blahblahblahhh.......but this here?  THIS will be the big bonus, because I plan to spend the entire summer at the beach in Grand Haven!

Friday, February 3, 2012

Mason Jar Salads!

SO....this is the beginning of week 3 on Weight Watchers and I am enjoying big success!  6lbs gone so far and I can already feel a big difference.  Here's something that has saved me AND encouraged my husband (Mr. Honey Bun and Mountain Dew), and my kids (no tag names needed), to eat healthier without even realizing.

So, here is our take on Mason Jar Meals, specifically Mason Jar Salads

Our first step:  Hunting and Gathering.  We have a lovely farm market here in Lansing, however, Lansing happens to be in MICHIGAN, therefore, fresh, locally produced foods are scarce, so please sub your own local, preferably organic produce if possible.


Our next step:  cleaning, cutting, chopping.  (and sampling)  We also boiled up some quinoa and some whole wheat rotini pasta.

Then, assembly.


Here are a few tips:

1. Dressing on the bottom, lettuce on the top.  If the two are touching the lettuce will turn to slime.
2. So, dressing goes in first.  On top of your dressing, use a rather "hearty" vegetable, such as shredded cabbage, pea pods, or julienne carrot matchsticks.  They can withstand the acidity of the dressing, and actually get better!
3. Pack it in.  Use a nice variety of colorful vegetables!  Make it fun and involve the kids.

Here are some of our recipes:

Poppyseed: Layer, in this order:

-poppyseed dressing
-carrot shreds
-green peas
-pineapple
-blueberries
-raspberries
-lettuce

Asian:
-light asian ginger dressing
-peapods
-carrot shreds
-cabbage shreds
-water chestnuts
-green peas
-bean sprouts
-quinoa
-toasted sesame seeds
-lettuce

Seafood

(I make a light dressing with light mayo, skim milk, s and p, and parmesan
-dressing
-cabbage shreds
-cherry tomatoes (halved)
-black olives
-celery
-drained canned crab / drained canned salad shrimp
-lettuce

Caesar:

-light Caesar dressing
-carrot shreds
-diced grilled chicken
-celery
-cukes
-lettuce
-parmesan
(add croutons later) ...they get mooshy in the jar.

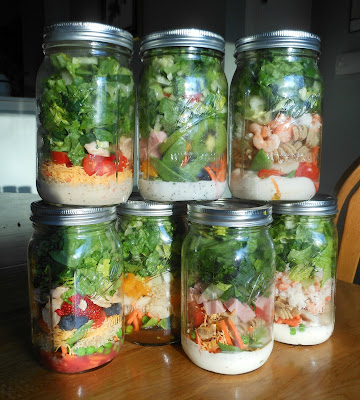
Here's what you will have when you're done.  Aren't they gorgeous?  


...and here's a closeup:


We also made rainbow fruit salads....layered in this order:

-blueberries
-honeydew
-cantaloupe
-pineapple
-strawberries
-raspberries
(we HAD kiwi, but forgot to add!)


Now, don't forget to label the lids!  We use a Sharpie.  The Sharpie ink can be removed easily with a Mr. Clean Magic Eraser for your next use.

Annnnnnnd....I could never finish this post without a photo of my lovely assistant and head kid in charge of nom nom nom noms.........she eats these every day!